We spent many hours on research to finding how to remove melted plastic from oven racks, reading product features, product specifications for this guide. For those of you who wish to the best how to remove melted plastic from oven racks, you should not miss this article. how to remove melted plastic from oven racks coming in a variety of types but also different price range. The following is the top 10 how to remove melted plastic from oven racks by our suggestions
817 reviews analysed
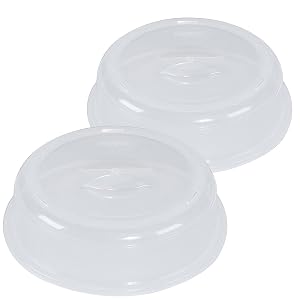


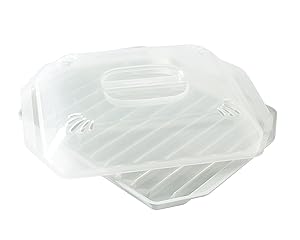


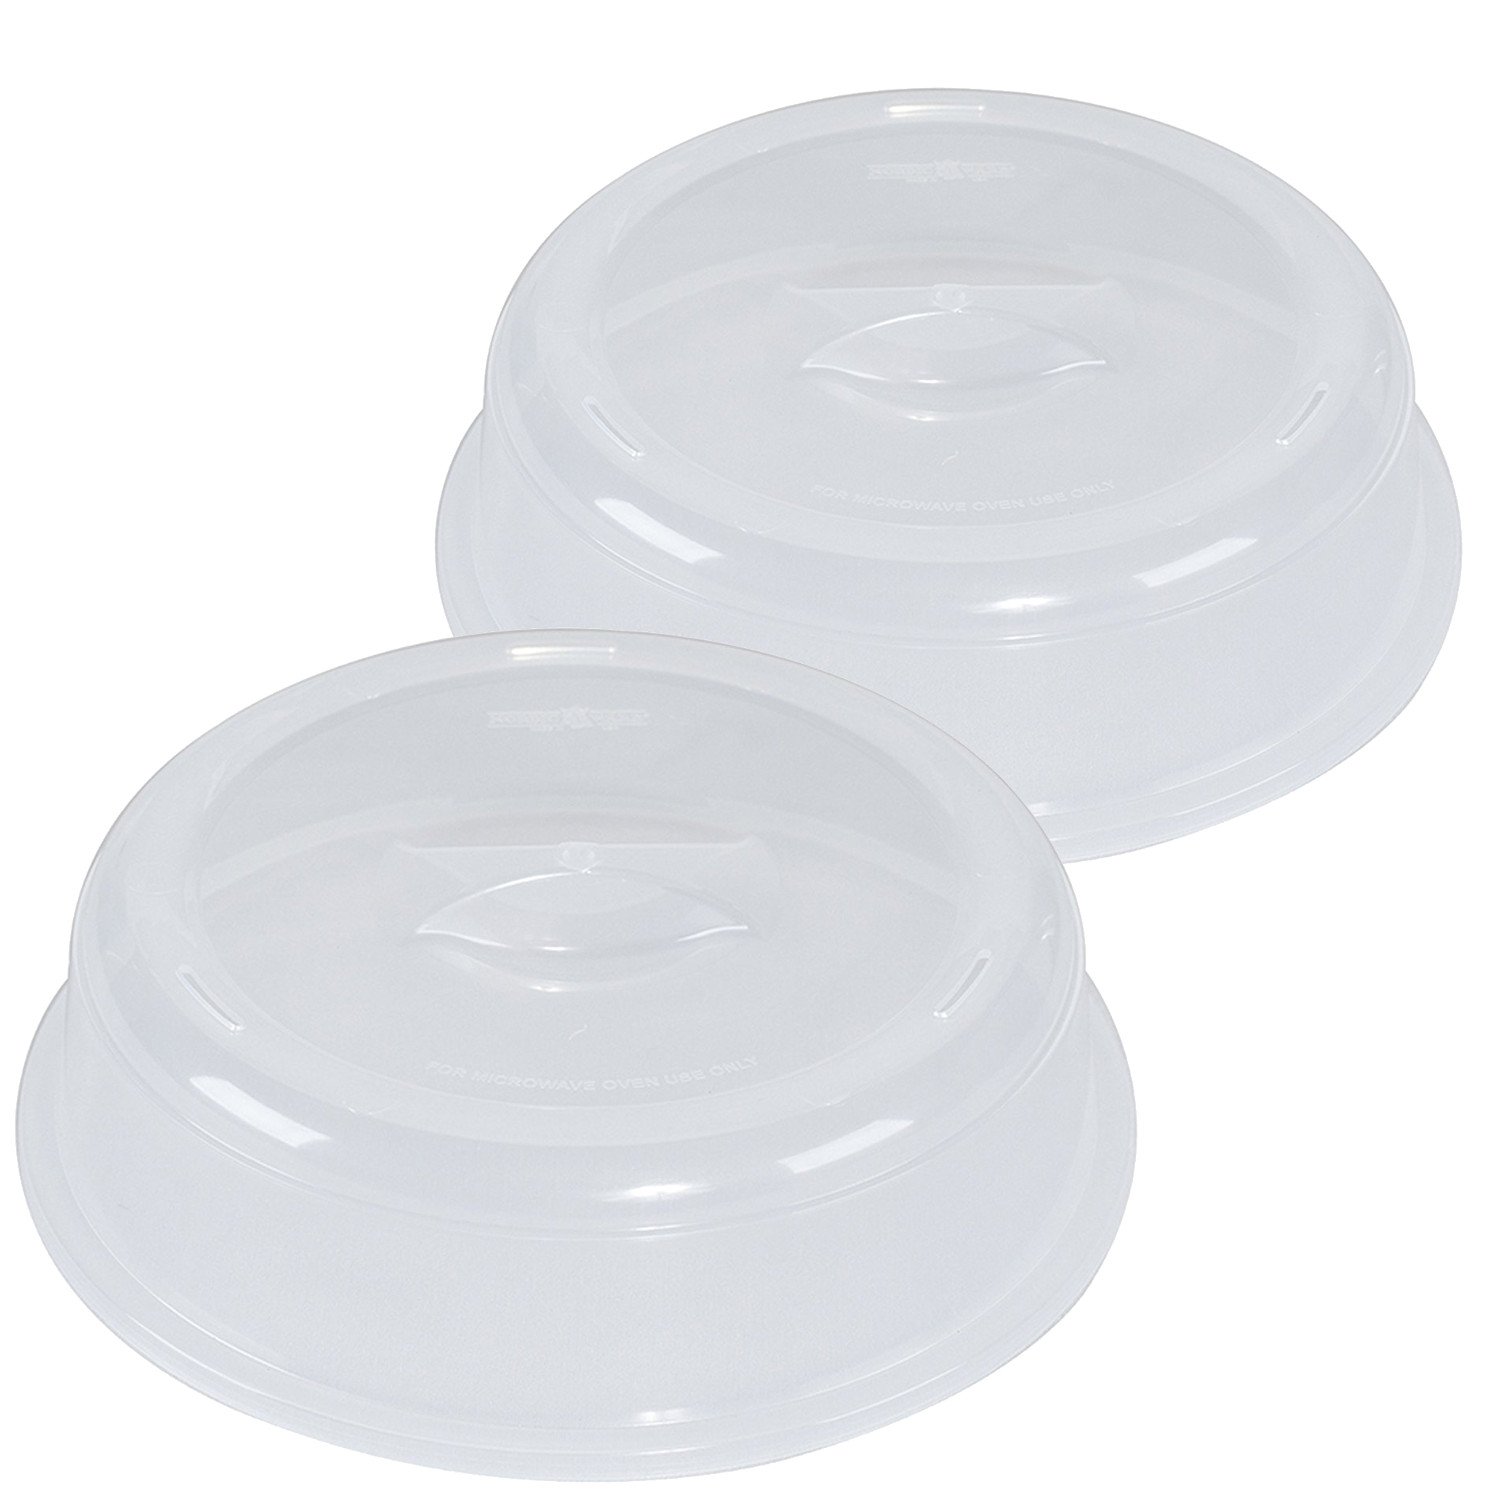
1. Nordic Ware 10" Splatter Covers, 2 Pack
Feature
- Protects against food splatter while cooking and keeps food warm after cooking
- Fits dinner plates up to 10 inches in diameter, covers dimensions are interior dimensions 9.375 x 9.375 x 2 inches and exterior dimension 10.5 x 10.5 x 2.125 inches
- BPA and Melamine free plastic, top rack dishwasher safe
- Vents in lid prevent steam build up
- Made in the USA
Description
Fits standard dinner plates and the Nordic Ware 2-sided bacon-meat grill. Allows you to view food without spatters in the microwave. Proudly made in the USA.
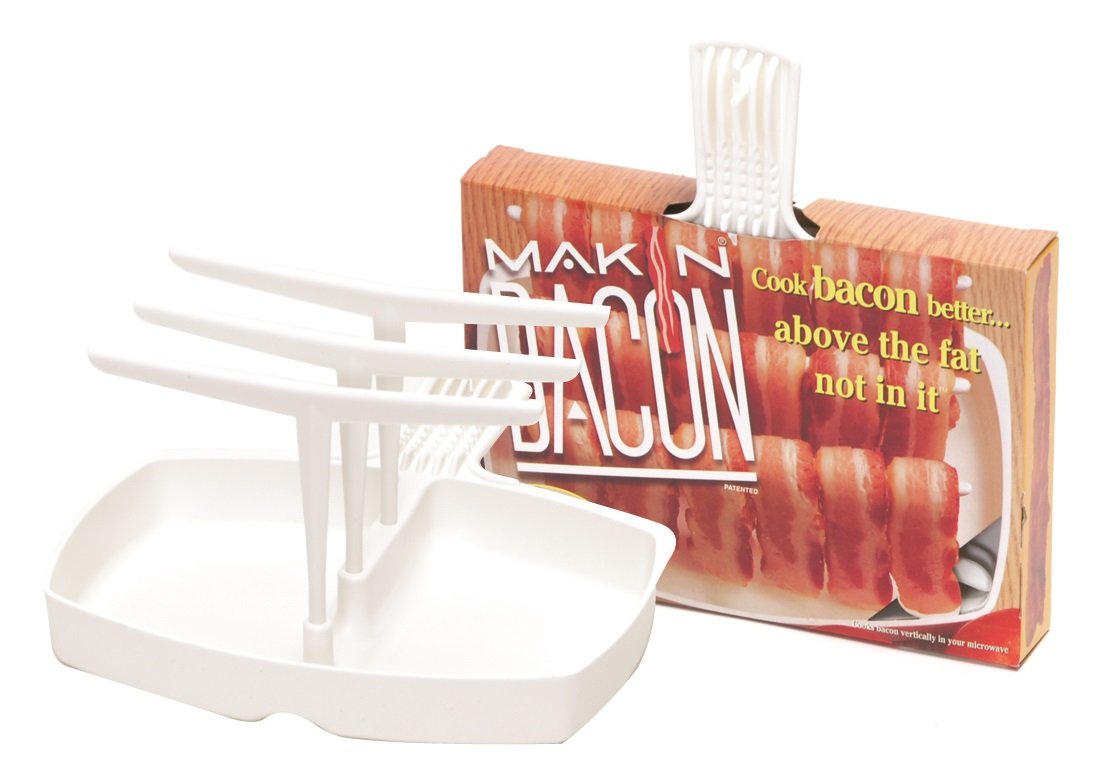
2. Microwave Bacon Cooker – The Original Makin’ Bacon Microwave Bacon Rack – Reduces Fat up to 35%
Feature
- Cooks bacon perfectly in minutes in the air – above the fat, not in it
- Just 1 minute per slice
- Microwave use only
- Reduces fat up to 35%
- Dishwasher safe
- Convenient tray catches fat which can be used later for frying
- Easy clean up – no fat splashes in microwave
- Made in USA with specially formulated high heat plastic
- Cooks bacon in the air and not in the fat. Up to 35% reduction in fat intake
- Capture the fat in the tray -NOT on the bacon
- Dishwasher safe
- Easy clean up – no fat splashes in microwave
- Made in USA with specially formulated high heat plastic
Description
Microwave Bacon Cooker Tray – The only way to cook bacon! This microwave bacon cooker cooks the bacon in the air and not in the fat. Simple and easy to use – hang the bacon over the bars, place one sheet of roller towel over the bacon and into the microwave. With the right amount of time you have crispy bacon with up to 35% less fat. Instructions: 1. For one to six bacon strips, use on drip bar at the center> -For 7-12 bacon strips, two drip bars at the front and back -For 13-18 bacon strips, use all three drip bars. 2. Drape bacon strips over each drip bar. For best results, distribute bacon strips evenly on the drip bars 3. Place a paper towel over the drip bars to control splatter. 4. Place the MAKIN BACON dish in the center of the microwave. Cook bacon on high power 1/2 – 1 minute per strip. 5. Remove bacon from drip bars and pour bacon fat from the dish (at the corner). Enjoy the easy access to fresh, perfectly cooked bacon!
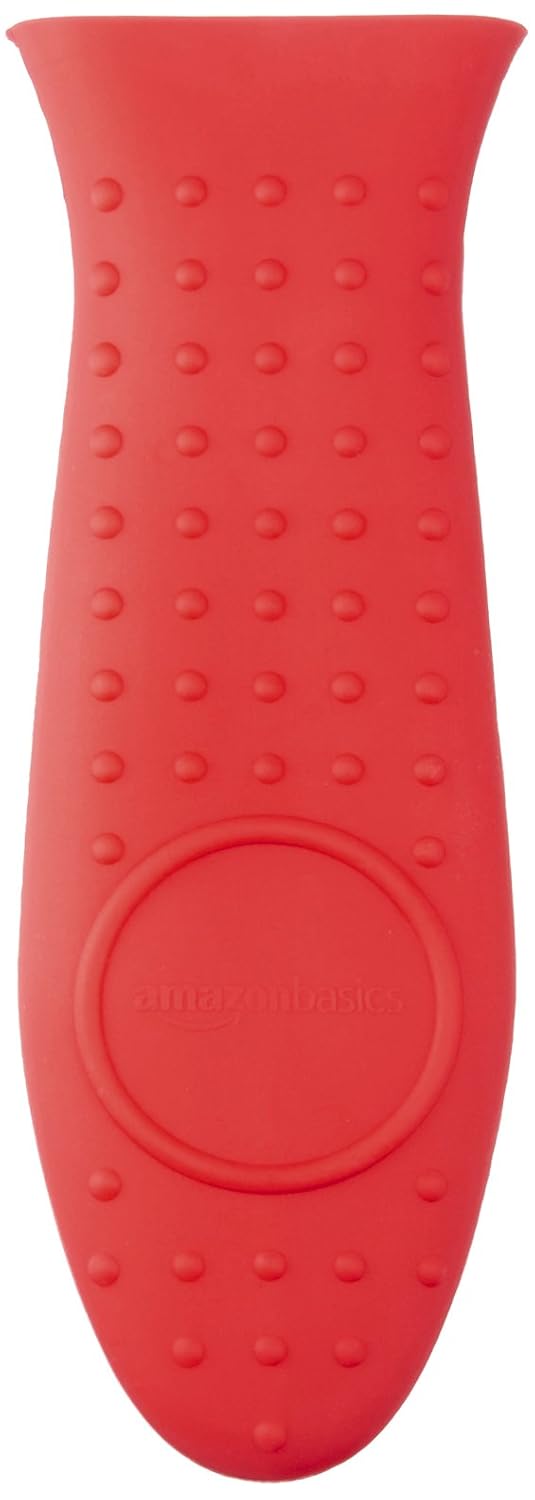
3. AmazonBasics Silicone Hot Handle Cover/Holder – Red
Feature
- Insulating kitchen accessory protects hands from hot pan handles
- High-quality, heat-resistant silicone creates insulating layer of protection
- oven safe up to 475 Degrees F/250 Degrees C
- Works with a variety of long cookware handles including most cast iron skillets
- sleek alternative to traditional pot holders and oven mitts
- DO NOT use holder when coming in contact with open flames, leave the holder on the handle while cooking in the oven, or use with temperatures higher than 250 degrees C/475 degrees F for longer than 1 hour
- DO use as a guard to protect your hands from burns, use the anti-slip grip to slide the holder onto a hot handle, and use to transfer hot items to and from the oven
- Slides on and off easily
- stays securely in place while in use
- measures 5.6 inches long x 1.9 inches wide
Description
An Amazon Brand.
4. Nordic Ware Compact Bacon Rack with Lid

Description
Put some fun in your microwave with our durable and functional microwave items. We paired our popular bacon rack with a lid to keep spatters contained. Both pieces clean up easily in the dishwasher. BPA and Melamine free. Heat safe up to 400 degrees. Made in the USA.
5. Silicone Candy Molds + eBook With 5 Candy Recipes – 6 Pack – Silicone Molds For Fat Bombs – Candy Molds Silicone – Chocolate Molds Silicon Molds Candy Mold Silicon Mold Hard Candy Molds Fat Bomb Molds

Feature
- ✅ FREE 5 CANDY RECIPES – Together with these fat bomb molds you will receive “5 Recipe eBook” which will be sent to your email at same day as your silcone molds arrive. Those 5 recipes were exclusively created for the chocolate molds you are buying. You will love it! ***All rights reserved. Any unauthorized distribution of this e-Book will constitute an infringement of copyright.
- ✅ 6 PACK – GREAT VARIETY – You are getting 6 different silicone molds for fat bombs to please those who you love with a great variety of candies. Each silicone mold is unique… For the price you pay, you are getting the next silicone candy molds: Smile Mold, Star Silicone Mold, Shell Mold, Round Mold, Heart Silicone Mold and a Flower Mold. Each candy mold is 8” long and 4” wide. The average silicon mold cell size is 1” wide and 0.4” deep.
- ✅ SAFETY – Our silicon molds are BPA Free and FDA approved. So, the candy making supplies you are buying have no peculiar smell, they are soft, waterproof, easy to demold, fadeless and easy to clean. Our small silicone molds are durably made as we use only the highest grade candy molds silicone.
- ✅ ALL-PURPOSE – You can use it as silicone molds for baking, jello shot molds, hard candy molds, ice molds, mint molds for cream cheese mints or for any other purpose you may need it for. This chocolate molds silicone are 100% safe.
- ✅ ATTENTION !!!! — YOU ARE 100% COVERED when ordering these silicone molds for fat bombs — We will return your money with no questions asked if you decide to return your chocolate candy molds.
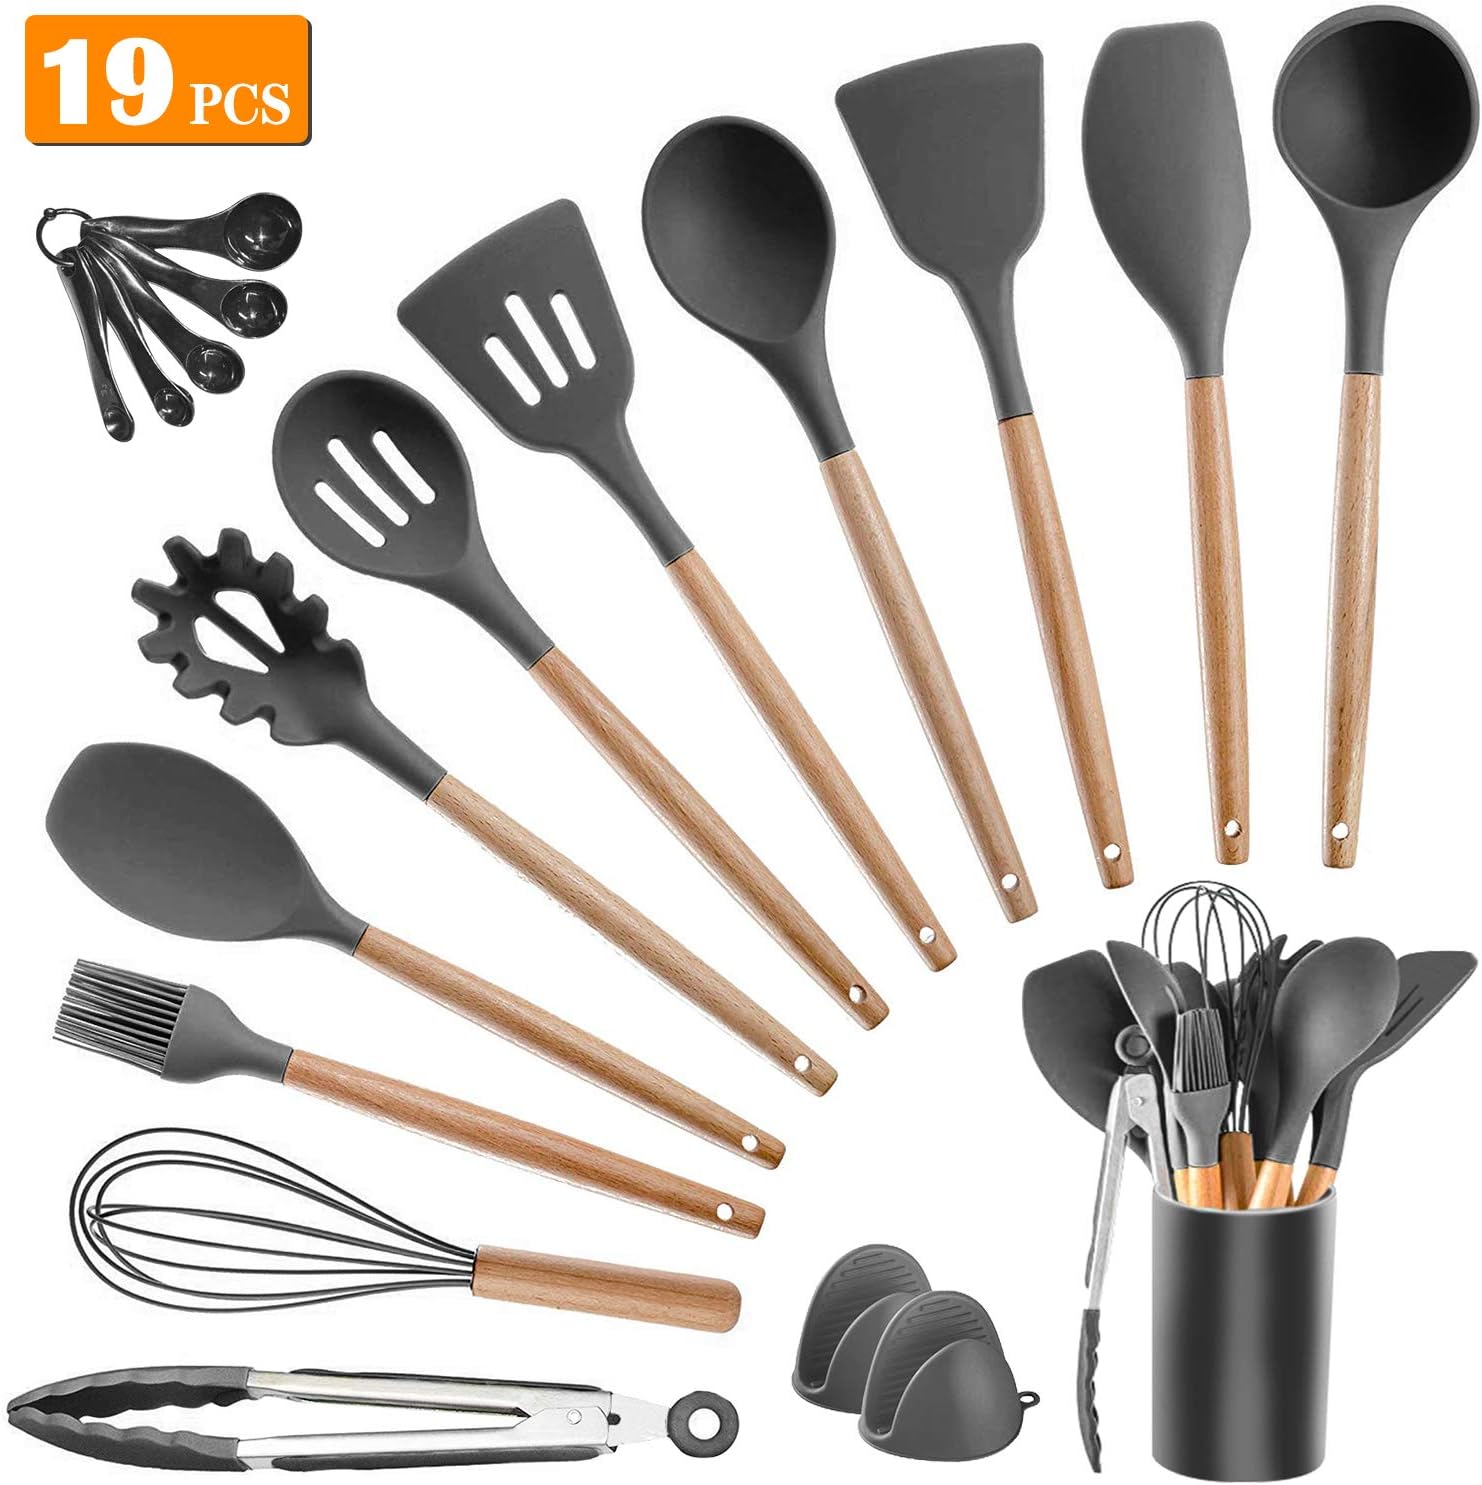
6. Kitchen Utensil Set Silicone Cooking Utensils – SZBOB 19pcs Kitchen Utensils Tools Wooden Handle Spoons Silicone Utensil Set Spatulas Set Cookware Turner Tongs Whisk Kitchen Gadgets with Holder
Feature
- ????19 PIECES IN ONE SET ORGANIC SILICONE COOKING UTENSILS: The silicone kitchen utensil set includes 12 pcs cooking tools that will suit all your cooking and baking needs. Our silicone kitchen utensil set includes: Tong, Whisk, Basting Brush, Slotted Spoon, Slotted Turner, Pasta Server, Spoon, Spatula, Round Spatula, Solid Turner, Soup Ladle.Also come with the gift of 5pcs small Measuring Spoons of different sizes black color and 2pcs Silicone Mini Glove.
- ???? HEAT-RESISTANT, NON-STICK & NON-TOXIC: Our silicone cooking utensil set 11pcs all are use food grade silicone which are super heat resistant up to 464°F ( Note: the 2pcs mini silicone gloves withstand temperatures approx 250°F). The high heat tolerance of the silicone heads prevents the utensil from melting when exposed to heat. Kitchen utensils are also non-stick and non-toxic,easy to use and store.
- ???? SAFE UTENSILS FOR KITCHEN: Approved by the FDA and without BPA, cooking utensils for nonstick cookware. All kitchen tools are made of high quality thermoplastic silicone heads designed to protect the surface of precious non-stick cookware. silicone is safe to use for any type of food .The kitchen utensil set does not react with food or beverages, or produce any hazardous fumes.
- ???? ERGONOMIC DESIGN WOODEN COOKING UTENSILS: This cooking utensil set combination of silicone head and wooden handle, the wooden cookware handle is ergonomically designed for comfortable grip, does not transfer heat to protect your hands and provide protection against rust. A utility hanging hole on each wooden handle for convenient storage organization using hooks or a wall mount.
- ???? WORRY-FREE AFTER SALES SERVICE: Our kitchen utensil set with holder are under strict quality standards so you can use it with confidence. If you have any questions with this kitchen utensil set, please feel free to contact us and we will give you a satisfactory answer within 24 hours.
Description
Tips:
1. Do not use steel wool or grinding tools to clean the surface.
2. Keep dry after washing.
3. Do not soak in the dishwasher for a long time which may result in crack.
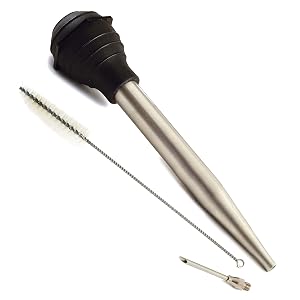
7. Norpro Deluxe Stainless Steel Baster with Injector and Cleaning Brush
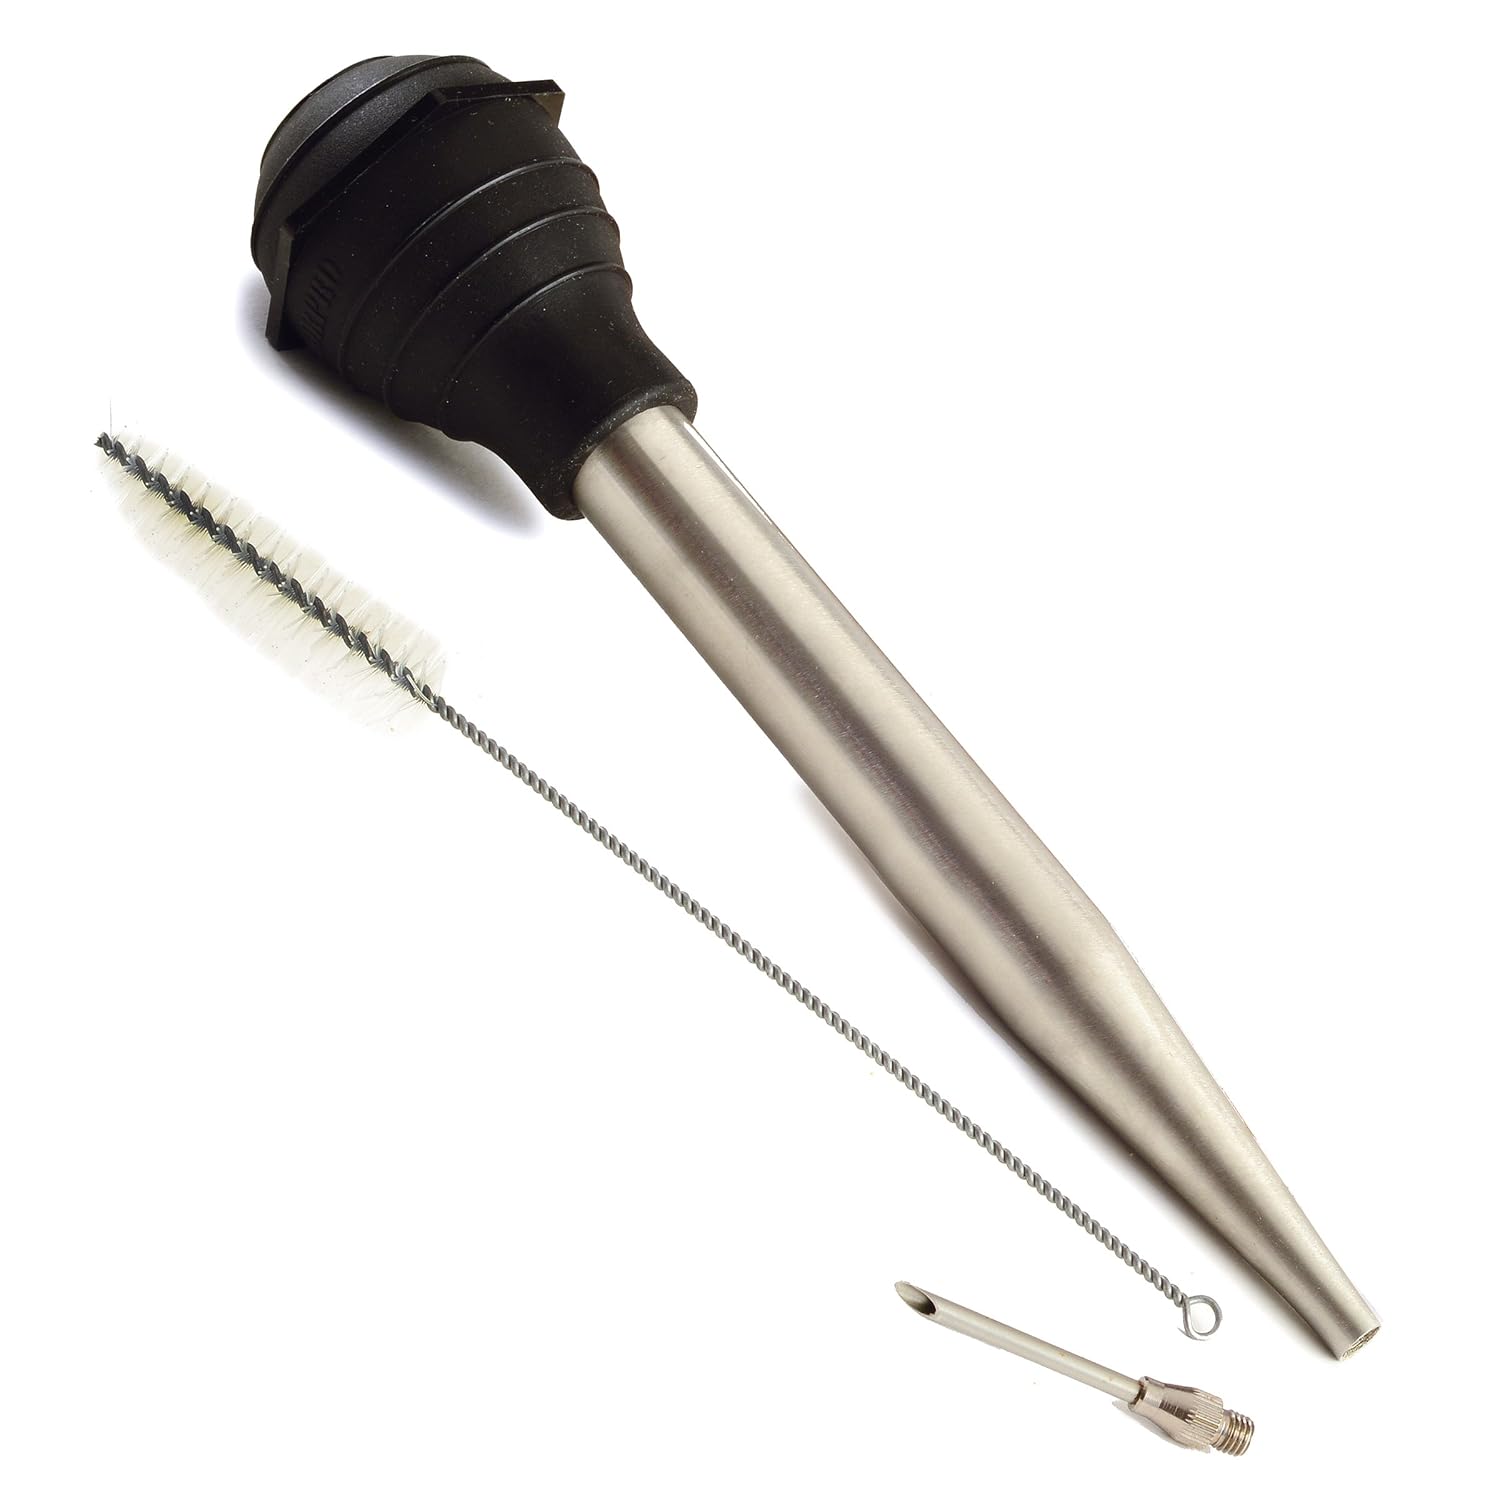
Feature
- Measures: 11″ x 2″ x 2″ / 28cm x 5cm x 5cm and has a capacity of 1.5oz / 45ml.
- Prior to baking or grilling, attach the needle included to inject and infuse flavorful juices into your roasts and cuts of meat.
- The secret to beautiful and flavorful roasts and grilling meats, served moist and golden brown, is basting.
- This tool creates powerful suction. Squeeze the bulb head, place tip of baster into the succulent juices in the pan, melted butter, a marinade or homemade sauce, release bulb head to draw up the sauce and pour out over your meat. Repeat every half hour or when grilling every 15 minutes.
- Silicone bulb heat resistant to 450˚F/230˚C.
Description
Measures: 11″ x 2″ x 2″ / 28cm x 5cm x 5cm. Capacity: 1.5oz / 45ml. Prior to baking or grilling, attach the needle included to inject and infuse flavorful juices into your roasts and cuts of meat. The secret to beautiful and flavorful roasts and grilling meats, served moist and golden brown, is basting. This tool creates powerful suction. Squeeze the bulb head, place tip of baster into the succulent juices in the pan, melted butter, a marinade or homemade sauce, release bulb head to draw up the sauce and pour out over your meat. Repeat every half hour or when grilling every 15 minutes. For best results, run the baster under hot water before basting, so the temperature of the baster will be warm. Remove roast from oven while basting and keep oven door closed. Baste quickly. This will keep the temperature of your oven from dropping. Silicone bulb heat resistant to 450˚F/230˚C. Stainless steel flavor injecting needle and cleaning brush included.
Norpro was founded in 1973 with a vision to design, manufacture, and supply the highest caliber kitchenware. Norpro’s offering of innovative, high quality product for cooking, preparing and serving food are produced with superior materials and craftsmanship.
8. Joseph Joseph 40023 Lotus Steamer Basket for Steaming Food and Vegetable Folding Non-Scratch BPA-Free, Green

Feature
- Steamer basket with self-adjusting sides to fit a variety of pots and pans. Minimum pan diameter 6.25 inches.
- Made of BPA-free polypropylene (heat-resistant up to 230°F) and silicone (heat-resistant up to 520°F)
- Features heat-resistant silicone side fins, silicone feet, and an innovative silicone finger guard to safely remove the steamer from the pot
- Large capacity when fully open, but folds neatly away for storage. Closed: 6 in diameter x 5 in tall
- Open: 10.5 in diameter x 5 in tall. Petals are 3 in long.
- Non-scratch material is suitable for use on both non-stick and stainless-steel cookware. Dishwasher-safe. Not suitable for the microwave.
Description
The classic, stainless-steel steamer basket design is taken to new levels of practicality and convenience with this striking, contemporary version. Made from polypropylene, the unit has self-adjusting sides to fit a variety of pans (minimum diameter 6.25 inches), heat-resistant side fins, silicone feet and an innovative silicone finger guard. It has a large capacity when fully open, but folds neatly away for storage. The unit is non-scratch and suitable for use with both steel pans and non-stick cookware. Polypropylene parts heat-resistant up to 110ºC/230ºF; silicone parts up to 270ºC/520ºF. Dishwasher safe.
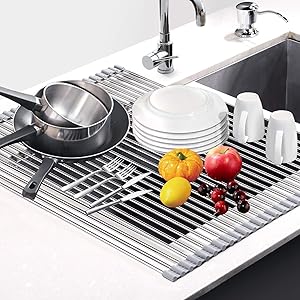
9. Dish Drying Rack 17.6" x 16", G-TING Over Sink Roll Up Large Dish Drainers Rack, Multipurpose Foldable Kitchen Sink Rack Mat Stainless Steel with Silicone Rims for Dishes, Cups, Fruits Vegetables

Feature
- √[Multiple uses ]: Heat resistant up to 446°F (230°C), BPA-Free, so you can use this foldable rack as dish drying rack and trivet cooling rack. Great for air-drying dishes, draining, vegetable colander, protecting counters from hot pots and pans. This dish dryer can also be used as prep works platform over the Sink.
- √[ Easy to store]: Foldable design, easy to store. When the dish drying rack is not using, you can easily roll it up and put it in your cabinet. This roll up dish drainer won’t take up your kitchen space. Saving you space and making your kitchen sink area neat
- √[ Easy to clean]: Rust resistance and food grade silicone-coated edge.The pipes can be easily removed from the silicone rims, so the rack can be cleaned thoroughly. Easy to clean, and not afraid of rust and oil.
- √[ Large dimension]: Size:17.6″x 16” with 23 PCS 304 stainless steel pipes which can efficiently dry dishes and proper drainage and ventilation. You can dry more dishes, pots and pans than other dish drying rack. Before purchase the roll up kitchen rack, remember to measure your kitchen sink .
- √[Strong and sturdy ]: Weight only 475g, but this dish drying rack still can support up to 33lb (15KG). 23 PCS stainless steel hollow pipes together create a durable construction which will not easily bend even with multiple dishes and heavy cookwares.
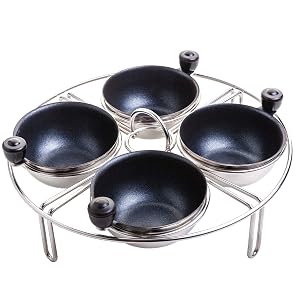
10. Egg Poacher Egg Rack| Fits many sized Pans Skillets and Pressure Cookers| Instant Pot Accessory features Stainless Steel Individual Egg Poaching Cups PFOA Free Non-stick Coating| Measures 7.25 inches

Feature
- MORE VERSATILITY FOR YOUR KITCHEN- This Eggssentials Egg Poaching Egg Rack works as an insert for many pans, pots, skillets and pressure cookers. It measures 7.25 inches in diameter and 2 inches tall including the handle. So it will fit in a pot where the inside diameter is larger than 7.25 inches. It is compatible with 5, 6 and 8 quart Instant Pot TM and Pressure Cookers.
- HIGH-QUALITY PERFORMANCE – Poacher cups hold 75ml- Easily holding an extra large egg. Unlike the cheap egg poacher pans with plastic cups and silicone poaching cups on the market, these Poaching Cups are from stainless steel with a high quality nonstick coating. No messy residue that never fully washes out or melted plastic! Stainless Steel Poacher Cups will cook the eggs faster and more evenly and last for many years. Silicone & Plastic are insulators and will not help in the cooking.
- SAFE AND EASY TO USE- These deluxe poacher cups feature a convenient Bakelite handle that cools down from the heat quickly and makes for easy removal. Each cup can be individually removed and poured directly onto your breakfast plate or toast. Many Silicone Cups will tip over and spill in the pan or Pressure Cooker. The Eggssentials Egg Rack will keep all your eggs free of spills and mess. The egg insert features a handle in the middle to make it easy to remove from your pan or Instant Pot TM.
- EASY TO USE AND CLEAN UP- Just 5 minutes to have perfectly poached eggs. All you need is ½ an inch of boiled water in order to poach the eggs and less than 5 min to cook them. Nonstick coating make cleanup a synch. They are dishwasher safe so you do not have to spend unwanted time cleaning up. EASY TO STORE- get the advantages of a specialized egg poacher pan but at the same time save on storage space. The Poaching Cups are stackable and the rack small enough to be easily stored in a cabinet.
- A HEALTHIER BREAKFAST ALTERNATIVE- PFOA FREE ANTI-STICK COATING- The only Egg Poaching Cups that has a PFOA anti stick coating. BUY WITH CONFIDENCE- IF IT DOES NOT FIT YOUR DESIRED COOKWARE, WE OFFER A 100% EASY REFUND. YOU HAVE NOTHING TO LOSE! TRY IT!
Description
Boasting a sturdy, durable stainless steel body and individually removable cups, this egg poacher rack is equipped with an innovative Bakelite handle that keeps hands better protected from high heat. This easy-to-use poacher rack features cups that are nonstick and are PFOA FREE that makes food release super easy and clean-up quick.
Included one egg rack and four poaching cups. Rack and individual nonstick cups can be removed easily without the use of extra tools and are dishwasher safe.
For pans or skillet
1- Place half inch of water in the bottom of the pan, and bring it to a boil over medium heat. Once the water is at a boil, let it simmer.
2- For even easier cleanup, we recommend you use a touch of nonstick spray or butter (not required), and then crack an egg into each cup.
3- Insert the tray and cups into the pan, and place the lid on top.
4- You will notice that steam is gathering under the lid. The steam cooks the eggs until your desired liking. It only takes about 5 minutes from start until finish, so you can enjoy your poached eggs in no time.
5- Once cooked, carefully, remove the tray from the pan, and use the knobs on each cup to gently pour each perfectly-shaped poached egg out (no extra tools needed). You might need a napkin to handle the knobs once they have been heated up or wait one minute and they will be cool to touch.
And voila! Your eggs are ready to serve and enjoy
For Pressure Cookers
1- Place half inch of water in the bottom of the Pressure Cooker
2- For even easier cleanup, we recommend you use a touch of nonstick spray or butter (not required), and then crack an egg into each cup.
3- Insert the tray and cups into the Pressure Cooker, and twist on the lid.
4- Adjust the time and power to your desired doneness. It will be somewhere between 2-5 minutes. In order to hard boil the egg, simply let it cook a few extra minutes.
Conclusion
By our suggestions above, we hope that you can found How To Remove Melted Plastic From Oven Racks for you.Please don’t forget to share your experience by comment in this post. Thank you!